User Guide
Building visualizer projects with Tilvora
Everything you need to install Tilvora, publish a 3D floor visualizer, stock a Materials Library, and manage the quote requests that come back in — from your first GLB upload to your first quote reply.
What is Tilvora
Tilvora adds a full-screen, real-time 3D floor & wall visualizer to any WordPress site. A visitor rotates, zooms, and customizes a room — choosing tile or wallpaper designs from your own catalog — and sees every change rendered instantly in 3D. When they're happy with a design, they submit a quote request that lands in your inbox and in a dedicated Quote Inbox screen inside wp-admin.
Each Tilvora Visualizer project is independent, with its own 3D model and settings, and is embedded anywhere with a single shortcode. There's no WooCommerce dependency — Tilvora works on any WordPress site on its own.
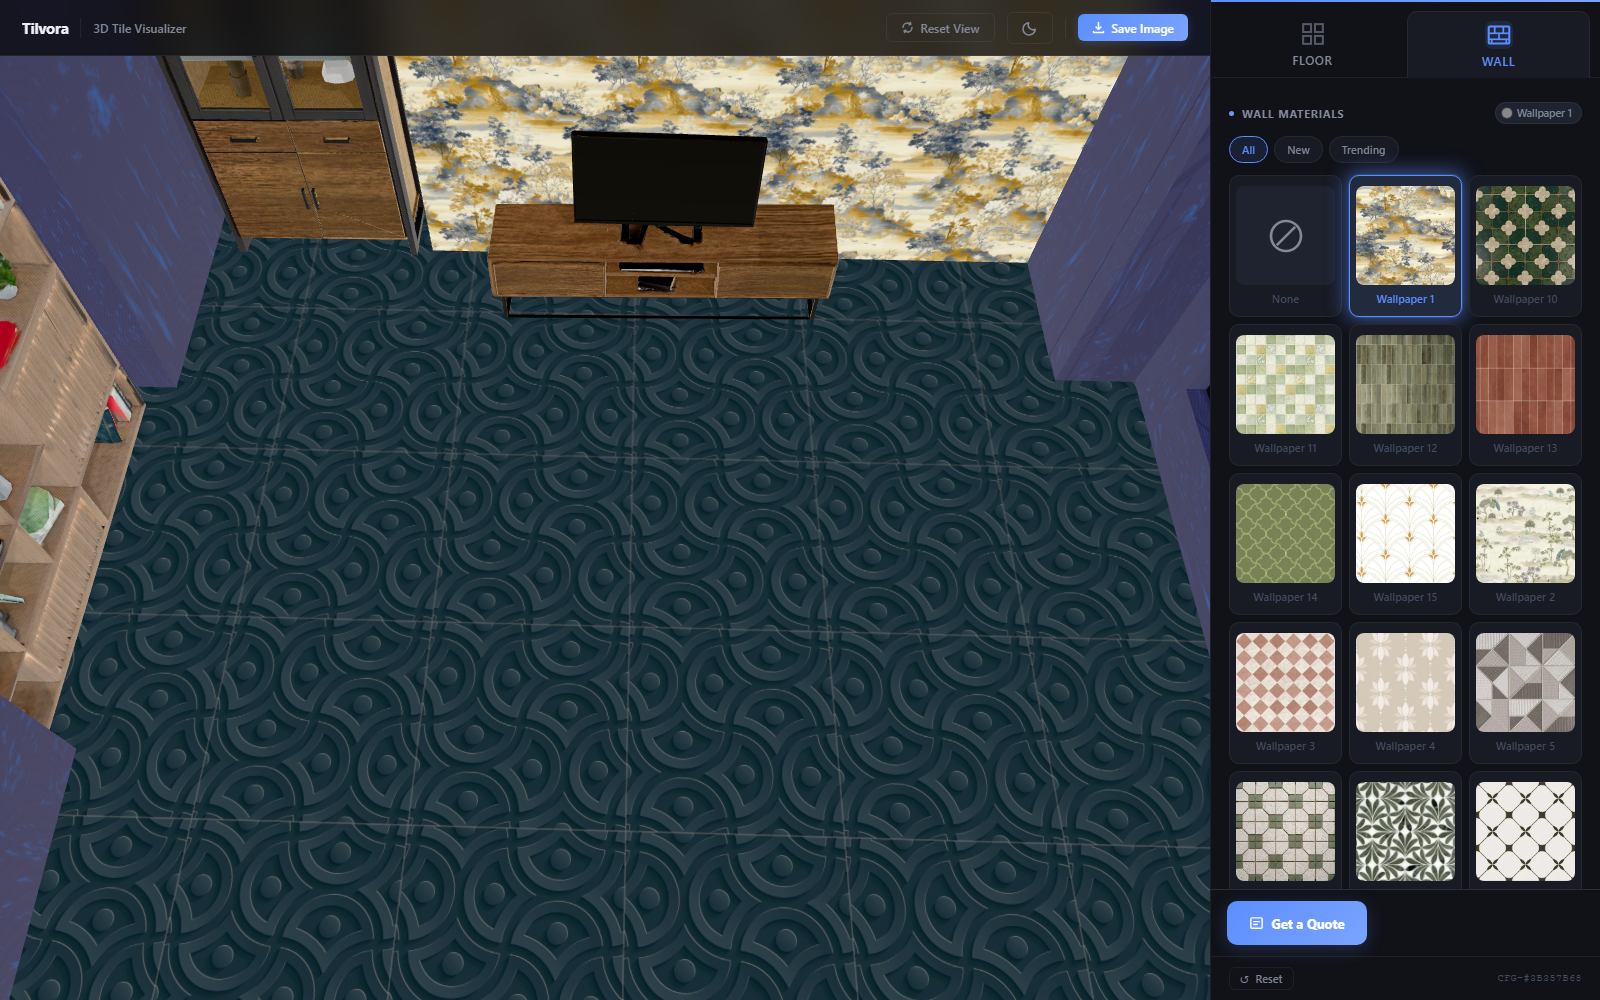
The 3D engine (Three.js) and its Draco decoder are bundled with the plugin and served entirely from your own site. Tilvora makes no calls to any CDN or third-party service — every asset the visualizer loads comes from your own server.
Installation
- Upload the plugin. In wp-admin, go to Plugins → Add New → Upload Plugin and choose the Tilvora zip file, or upload the plugin folder to
/wp-content/plugins/via FTP/SFTP. - Activate it. From the Plugins screen, click Activate under Tilvora — 3D Flooring Visualizer.
- Open Tilvora. A new Tilvora item appears in the left-hand wp-admin menu, with your visualizer projects, Materials Library, and Quote Inbox underneath it.
| Requirement | Minimum |
|---|---|
| WordPress | 6.0+ |
| PHP | 7.4+ |
| WooCommerce | Not required — Tilvora is fully standalone |
| Visitor's browser | WebGL support (all modern desktop and mobile browsers). Where WebGL isn't available, the visualizer shows a friendly error instead of a blank screen. |
No other plugin is required, and activation doesn't change anything on your live pages until you actually publish a visualizer project and place its shortcode.
Your first visualizer
You can have a working visualizer live in under a minute using Tilvora's bundled sample tile model — no 3D model or catalog of your own required yet.
- Go to Tilvora → Add New. Give the project a title (e.g. "Living Room Floor").
- Leave 3D Model and Config JSON blank. Tilvora falls back to its bundled sample model and default settings automatically, so the visualizer works immediately.
- Click Publish. The metabox now shows a Visualizer URL you can open directly, and an Embed Shortcode like
[tilvora id="42"]. - Paste the shortcode into any page or post. It renders a "Design Your Floor" button that opens the full-screen visualizer.
From here, the two things worth customizing per project are your own 3D model and your own Materials Library — everything else (camera, tabs, pricing, branding) is optional and lives in the Config JSON.
Projects & embedding
The project editor
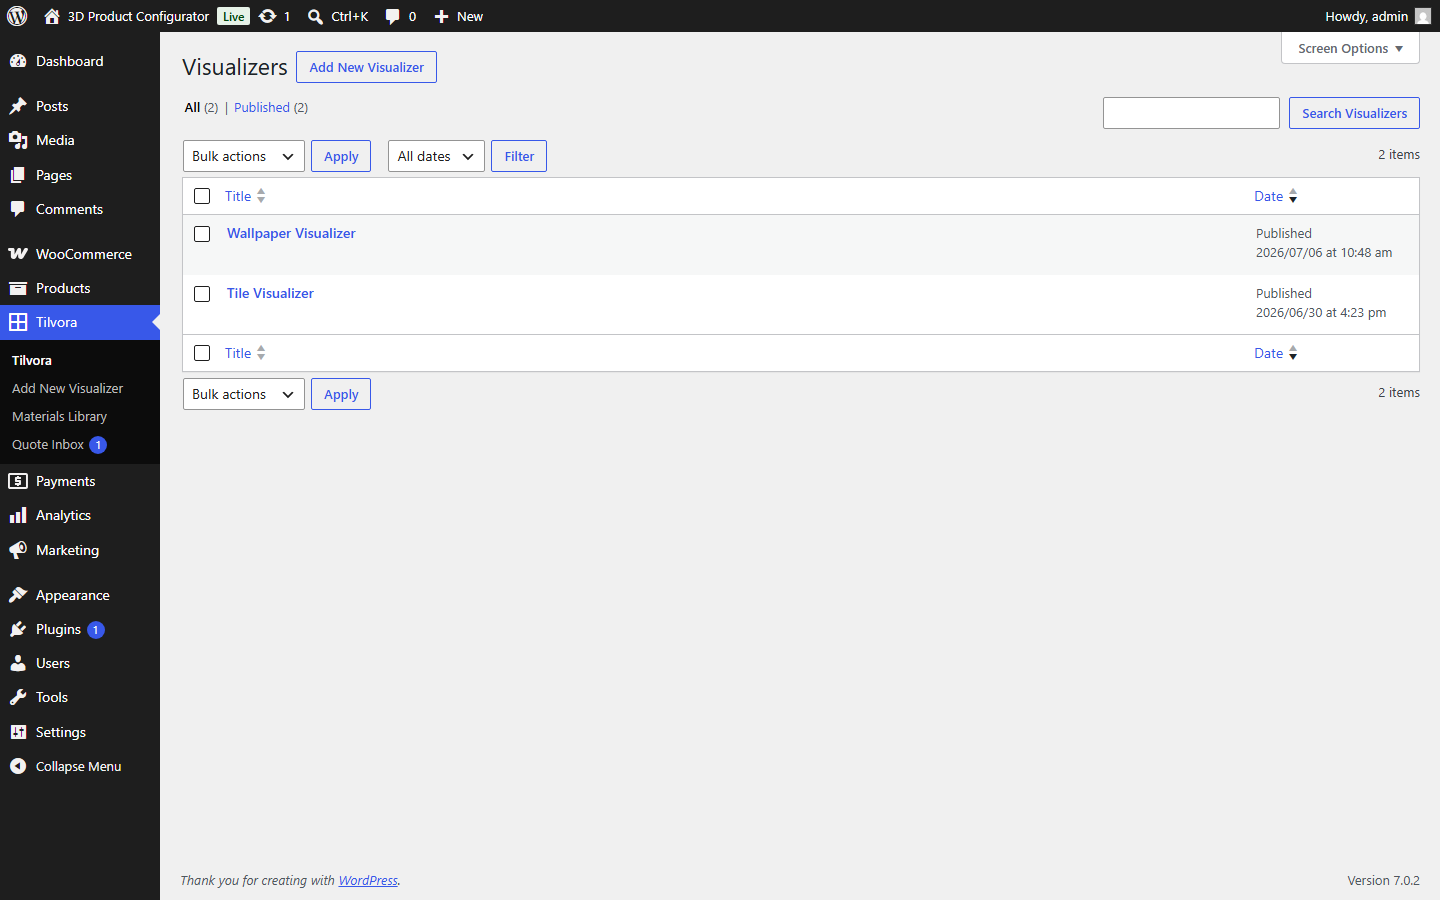
Every visualizer lives on its own project (Tilvora → Add New / edit an existing one). Each project is listed under Tilvora in the wp-admin menu, alongside its publish status:
The Tilvora — Visualizer Settings metabox on a project's edit screen has three parts.
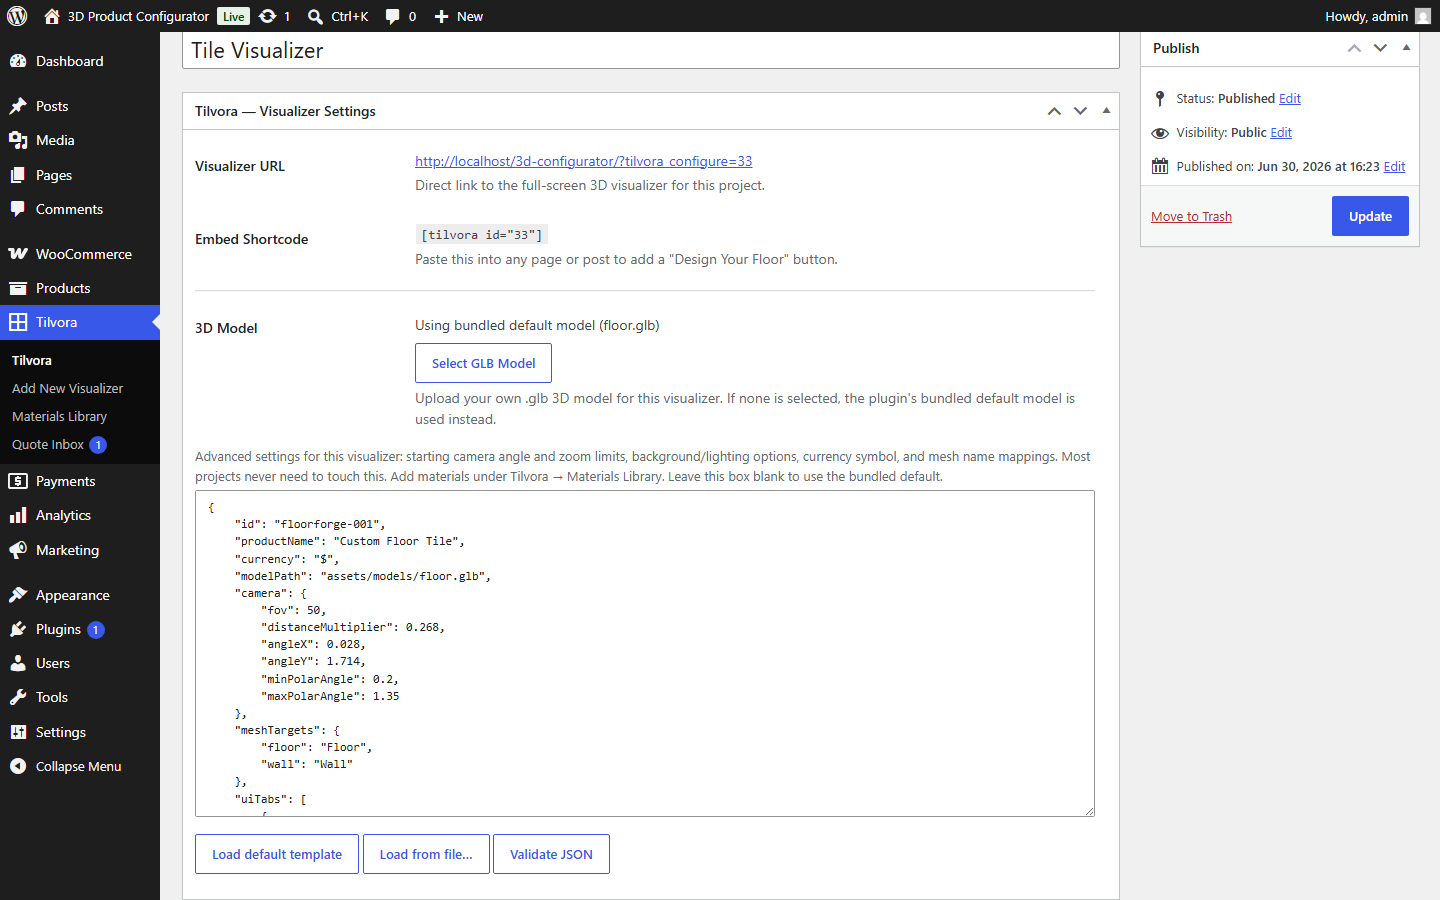
Visualizer URL & shortcode
Appears once the project is published: a direct link to the full-screen visualizer, and the [tilvora id="X"] shortcode for embedding it on any page or post.
3D Model
Upload a .glb file for this project via the media library picker (Select GLB Model). If you don't upload one, the project uses Tilvora's bundled default model (floor.glb). Click Remove to go back to the bundled default at any time. See Preparing a GLB model for what makes a model work correctly.
Config JSON
An advanced, optional settings block for this project — starting camera angle and zoom limits, which tabs and controls appear in the side panel, UI text/branding overrides, and which mesh names map to which controls. Leave it blank to use the bundled default. The toolbar above the box gives you:
- Load default template — click once to arm it, click again within a few seconds to overwrite the box with the bundled default JSON (a safe starting point to edit from).
- Load from file… — read a
.jsonfile from your computer straight into the box. - Validate JSON — checks the box's current contents are valid JSON without saving.
The box is saved automatically (via a background request) the moment you click Publish or Update — you don't need to click a separate save button for it. If what you entered isn't valid JSON, Tilvora keeps using the last good version (or the bundled default) and shows an inline error on the edit screen until it's fixed.
Most projects never need to touch the Config JSON box at all — add your tile and wallpaper products under Tilvora → Materials Library instead. Only open this box for things the Materials Library doesn't cover: the starting camera view, custom branding text, or adding a control type beyond the material grid.
Shortcode & embedding
Paste the shortcode shown on a published project into any page, post, or widget area that renders shortcodes:
[tilvora id="42"]It renders a styled "Design Your Floor" button that links to the full-screen visualizer for that project. You can override the button's label per placement:
[tilvora id="42" label="Try Our Tile Designer"]The shortcode outputs nothing if the id doesn't match a project, or if that project isn't published — so it's safe to leave a shortcode in a draft page without it showing a broken button.
You can place the same shortcode (same id) on as many pages as you like, and run any number of independent projects — each with its own shortcode — across the site at once.
About the Config JSON
The Config JSON is what drives the visualizer engine: what tabs appear, what each tab's controls do, which GLB mesh each control affects, the starting camera framing, and the text shown in the UI chrome. A full field-by-field breakdown is in the Config JSON reference at the end of this guide — this section covers the parts you're most likely to actually change.
Starting camera view
"camera": {
  "fov": 50,
  "distanceMultiplier": 0.268,
  "angleX": 0.028,
  "angleY": 1.714,
  "minPolarAngle": 0.2,
  "maxPolarAngle": 1.35
}
distanceMultiplier controls how far back the camera starts (relative to the model's size); angleX/angleY nudge the starting position sideways/upward; minPolarAngle/maxPolarAngle (in radians) limit how far a visitor can orbit up or down, so they can't flip the camera under the floor or too far overhead.
Branding & UI text
"uiText": {
  "brand": "Tilvora",
  "subtitle": "3D Tile Visualizer",
  "resetView": "Reset View",
  "exportPng": "Save Image",
  "addToCart": "Get a Quote",
  "resetAll": "Reset",
  "totalPriceLabel": "Total"
}
Every value here is optional and falls back to the built-in English label if omitted — override just the ones you want to change.
Tabs & controls
The uiTabs array defines the side panel, tab by tab. Each project's default JSON already includes a Floor and a Wall tab, each with one material-grid control pulling from your Materials Library. See Control types for every control type available if you want to add color pickers, finish swatches, scene lighting toggles, or a text-personalization field.
Materials Library
Adding a material
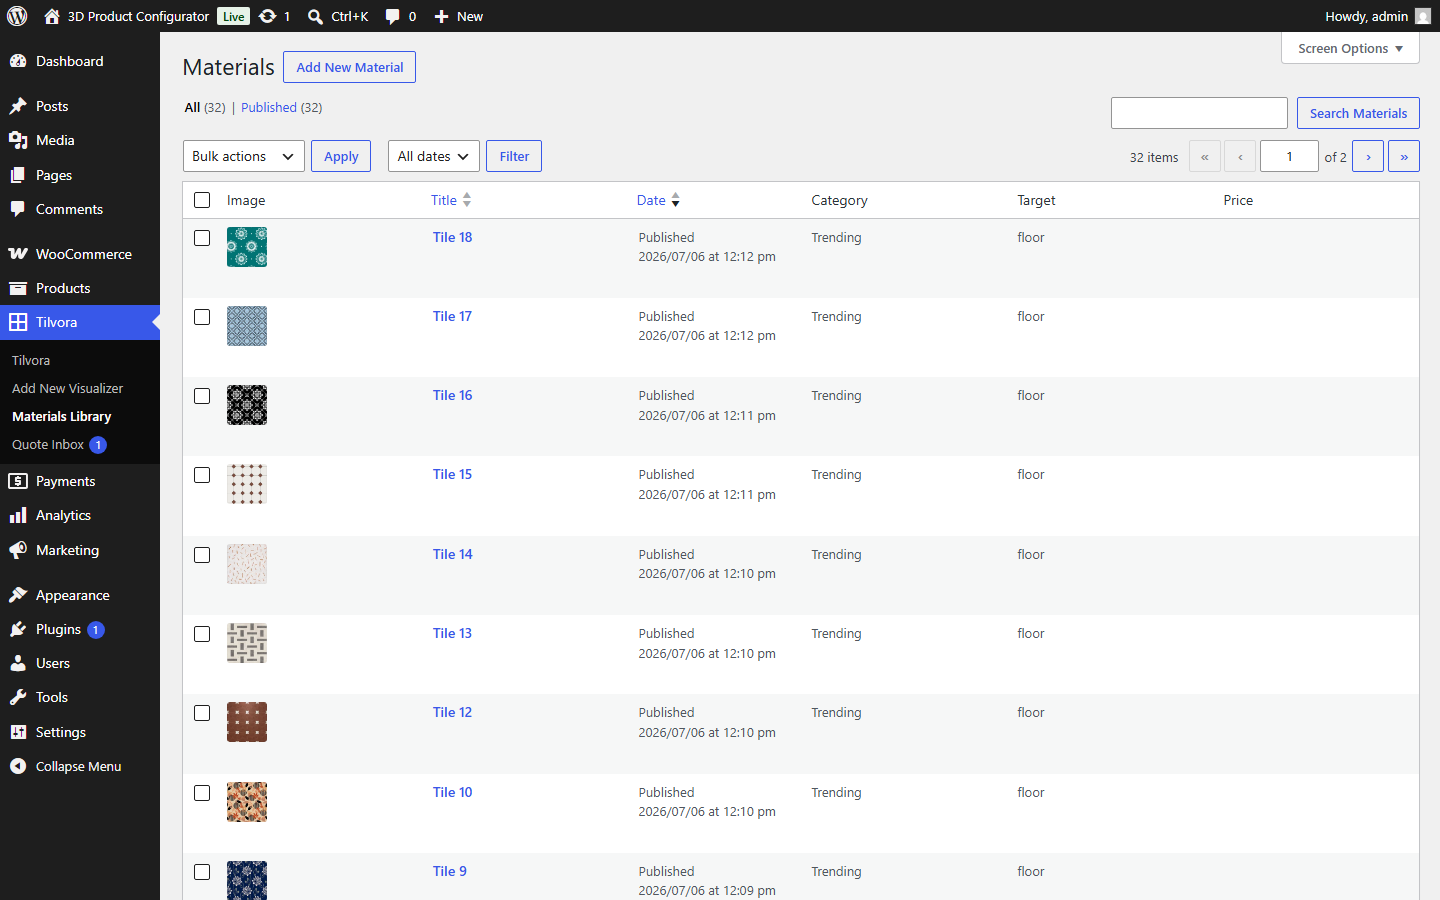
The Materials Library (Tilvora → Materials Library) is a shared catalog of tile, wallpaper, or other surface products. Add a material once and it's available to every visualizer project on the site — no Three.js, UV mapping, or JSON editing needed. You fill in the specs already printed on the manufacturer's own data sheet, and Tilvora works out the correct real-world texture scale automatically.
- Tilvora → Materials Library → Add New. Give it a title — this is the name customers see.
- Upload a Product Image. One photo is enough — see Tile & wallpaper images for what makes a good one.
- Fill in the Product Specification fields (below) and Publish.
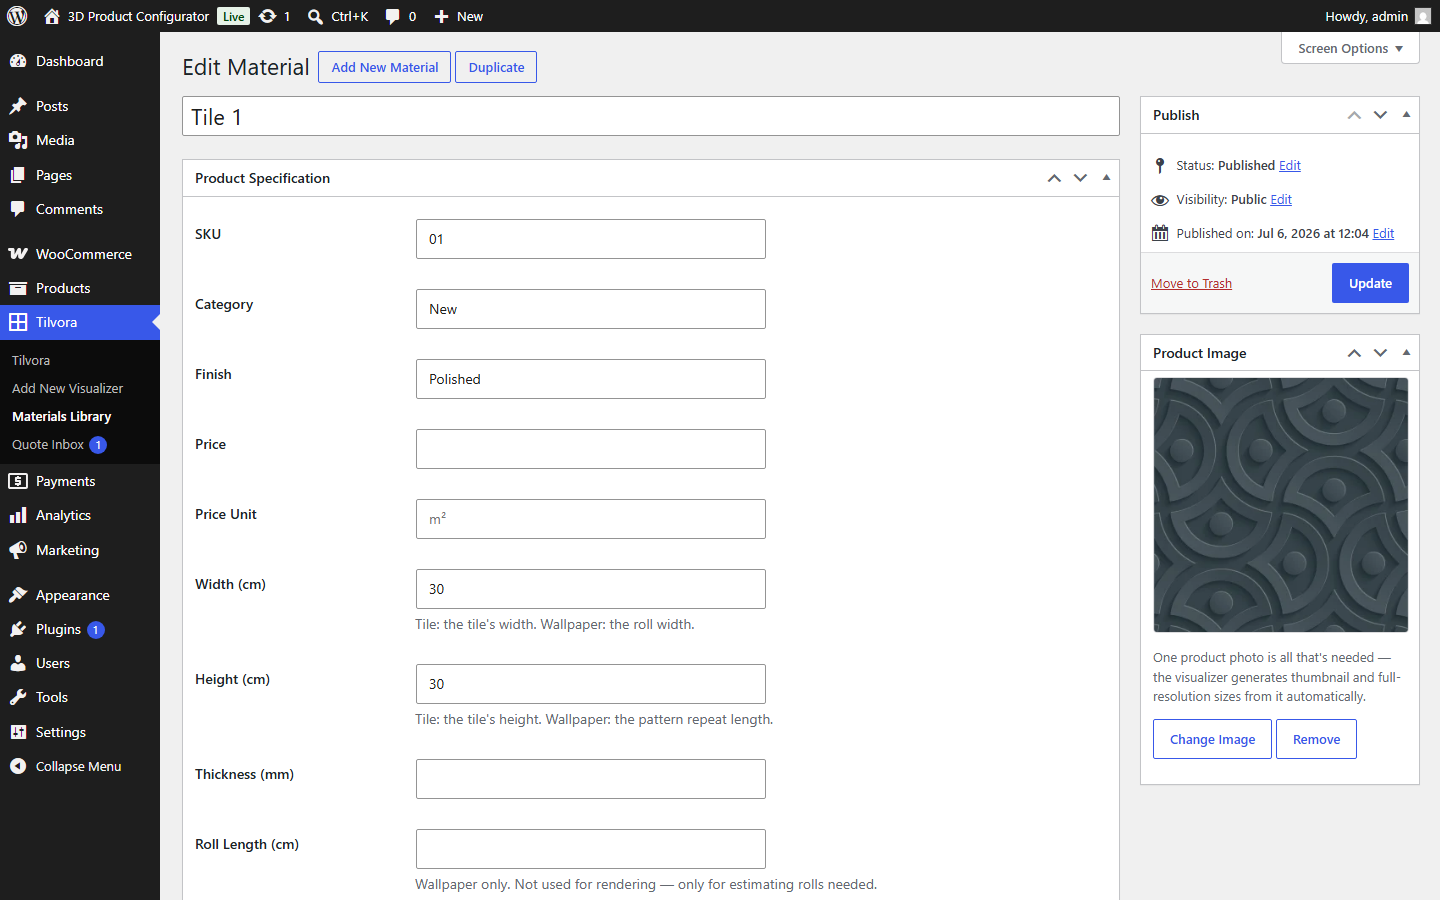
| Field | What it's for |
|---|---|
| SKU | Your own product code, for reference only. |
| Category | Free text, e.g. "Marble", "Ceramic Tile", "Wallpaper" — shown in the admin list, not to customers. |
| Finish | Free text, e.g. "Polished", "Matte" — reference only. |
| Price / Price Unit | Added to the visualizer's live price total when this material is selected. Unit is display-only text, e.g. m². |
| Width (cm) / Height (cm) | For a tile: the tile's own physical width/height. For wallpaper: the roll width and the pattern repeat length. This is what the renderer uses to compute correct tiling — not the image file's pixel size. |
| Thickness (mm) | Reference only; not used for rendering. |
| Roll Length (cm) / Roll Coverage (m²) | Wallpaper only. Not used for rendering — only for your own roll-quantity estimates. |
| Applies To (mesh target) | Which control this material shows up under — must match a meshTargets key in the project's config (typically floor or wall). See Preparing a GLB model. |
| Mapping Mode | Repeat (tile/wallpaper — the standard mode) or Fit (reserved for a future non-repeating product type; currently just skips tiling). |
Only published materials are served to the visualizer. Save one as a draft to keep working on it without it appearing to customers yet.
Tile & wallpaper images
The Product Image is uploaded through the standard WordPress media library, so any format WordPress accepts works: JPG, PNG, or WebP. What matters far more than the file format is what's in the photo, because of how the renderer uses it.
The visualizer doesn't scale the image based on its pixel dimensions. It repeats the image across the mesh using the physical Width (cm) / Height (cm) you enter on the material — so the photo itself needs to be a clean, tileable, square-on crop of the material for the repeat to look seamless.
- Seamless / tileable. Use a straight-on, evenly cropped photo (or a proper seamless texture) of the repeating pattern. A photo with visible grout lines only on some edges, a shadow, or a vignette will show a visible seam every time it repeats.
- Square, or matching the material's own aspect ratio. A tile that's square in real life should be photographed square; a rectangular tile or wallpaper repeat should keep that same width:height ratio in the crop.
- Evenly, neutrally lit. Materials render unlit — the customer sees the photo's true printed color, unaffected by the 3D scene's lighting. A photo with strong directional shadows or a color-cast light source will carry that straight into the render.
- High resolution. A reasonably large square image (around 1024×1024 up to 2048×2048 px) stays sharp when a customer zooms in. There's no hard minimum, but low-res photos will look blurry up close.
- Accurate dimensions. Double-check the Width/Height (cm) fields match the real product. Getting these wrong is the most common cause of a tile that looks stretched, too large, or too small once applied.
Duplicating a material
To add a new colorway or size of a product you've already entered, don't start from scratch. From the Materials Library list, hover a row and click Duplicate (or use the Duplicate button on the material's own edit screen). This creates a new draft with every field and the product image copied over — just change the title, image, and whichever spec differs, then Publish.
The 3D model
Preparing a GLB model
Tilvora accepts .glb (glTF binary) models exported from Blender or any similar 3D tool — it's not hardcoded to one mesh or product. Draco-compressed geometry is supported (the decoder is bundled with the plugin).
Mesh names must match your meshTargets
The Config JSON's meshTargets object maps a logical key (used by controls, e.g. "floor") to the exact name of a mesh node inside your GLB:
"meshTargets": {
  "floor": "Floor",
  "wall": "Wall"
}
This is an exact, case-sensitive match against the mesh's name as exported — not a partial or fuzzy match. If a name doesn't match anything in the loaded model, that target's controls simply won't have anything to apply to (check your browser console for a warning naming the missing mesh). In Blender, rename the relevant mesh objects (not just the containing collection) to exactly what your meshTargets values expect before exporting.
Model scale & UV unwrap
Tilvora computes each material's tiling automatically from two things: the mesh's own real-world bounding-box size, and the material's physical Width/Height (cm) from the Materials Library. For that to come out correct:
- Export the model at true real-world scale (1 Blender unit = 1 meter is the glTF convention) — a floor mesh that's actually 4m × 5m should measure 4 × 5 in your 3D tool before export, not an arbitrary scale fixed up later.
- Give the floor/wall mesh a clean, non-overlapping UV unwrap so the repeated texture tiles evenly across it rather than distorting at seams.
Testing a model live
Open any visualizer's full-screen URL and drag a .glb or .gltf file from your computer straight onto the page. It loads immediately as a live, local preview — nothing is uploaded or saved anywhere. Use this to check your mesh names and materials line up correctly before uploading the model properly through the project's 3D Model field. Refresh the page (or navigate away) to discard the test model and go back to whatever's actually configured for that project.
Customer experience
The visualizer screen
The full-screen visualizer is a standalone page (it doesn't use your theme's header/footer) with:
Top bar
Brand name (links back to your site), the current project's title, Reset View, a light/dark theme toggle (remembered per visitor), and Export PNG.
Side panel
One tab per entry in uiTabs — Floor and Wall by default, each showing a grid of your published Materials Library products for that target.
Price bar
Live running total with a line-item breakdown of anything carrying a price, and the Get a Quote button.
Reset All
In the panel footer — clears every selection back to the project's defaults.
On phones and small screens, the side panel becomes a draggable bottom sheet the visitor can collapse, expand halfway, or expand fully.
A visitor's selections are remembered in their browser between visits to the same project, so they can leave and come back without starting over. Reset All clears this saved state.
Requesting a quote
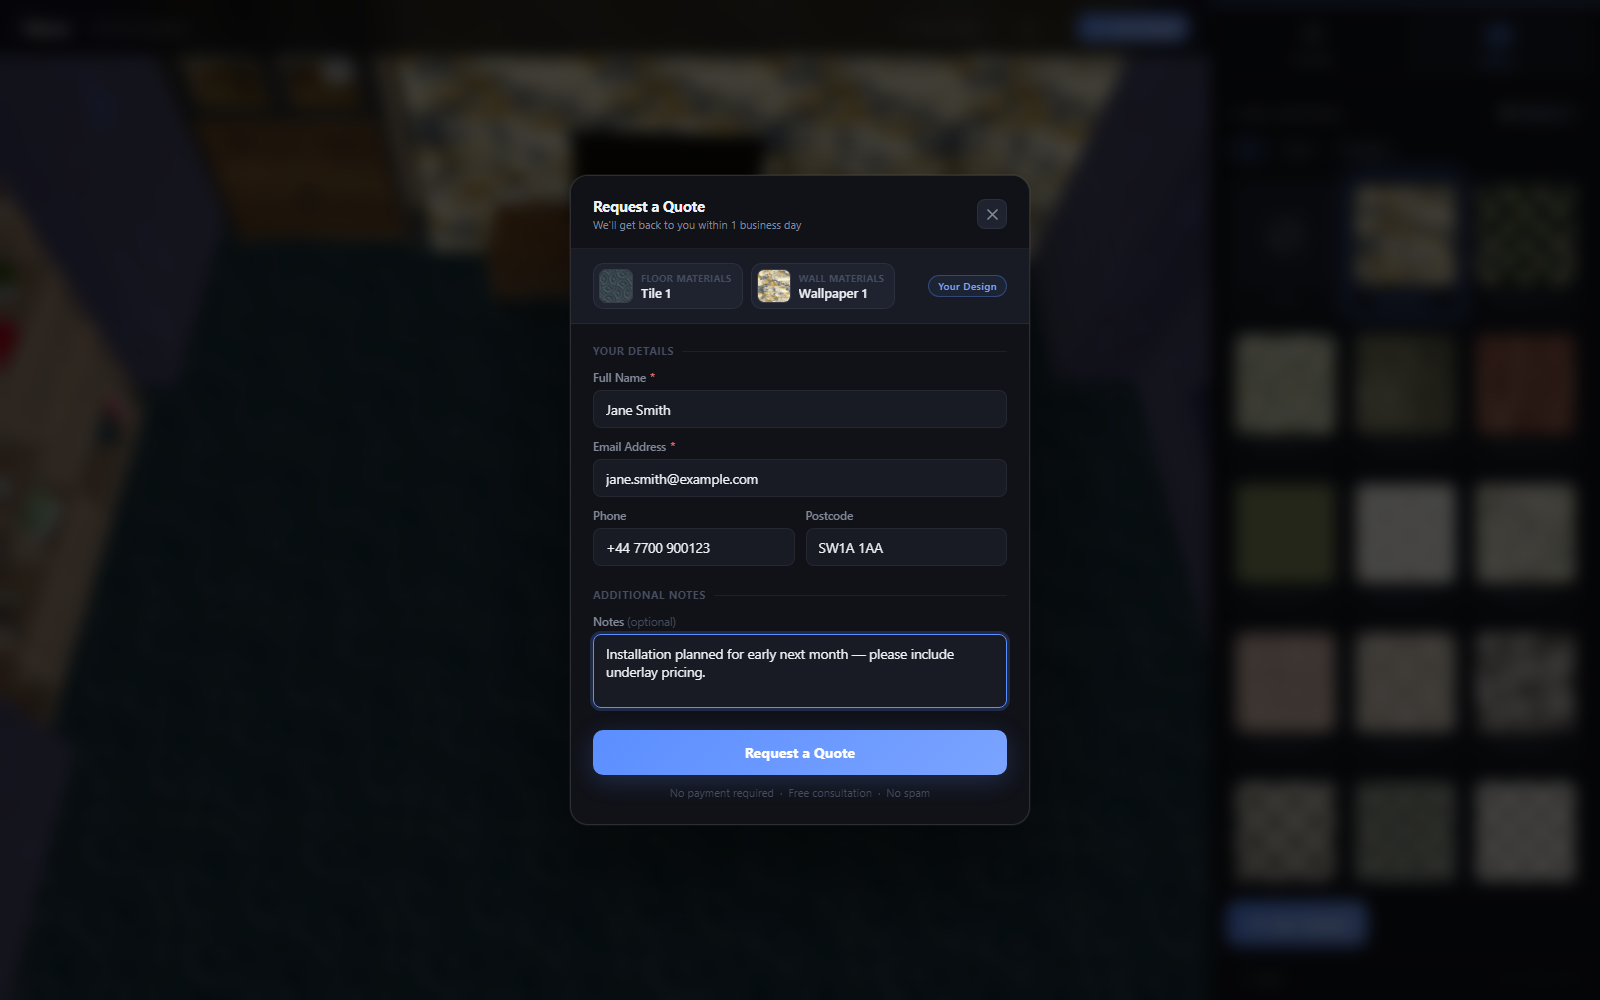
Clicking Get a Quote captures a snapshot of the customer's current 3D view and opens a form:
- Full Name and Email (required)
- Phone and Postcode (optional)
- Notes (optional) — free text for installation dates, special requirements, etc.
Above the form, the customer sees a chip for each of their current selections (e.g. their chosen floor tile and wall material) with its thumbnail. On submit, the request — including the design snapshot and the live price total — is saved to the Quote Inbox and two emails go out: one to your site's admin address, and a confirmation to the customer.
Quote Inbox
Managing quotes
Tilvora → Quote Inbox lists every submitted quote with the customer's contact details, their selection, and the price total. It supports:
- Status tabs — All / New / Replied / Completed, with a live count next to each.
- Search — matches against customer name or email.
- Sorting — by customer, status, or date received.
- Bulk actions — mark as Replied, mark as Completed, or Delete across multiple selected quotes at once.
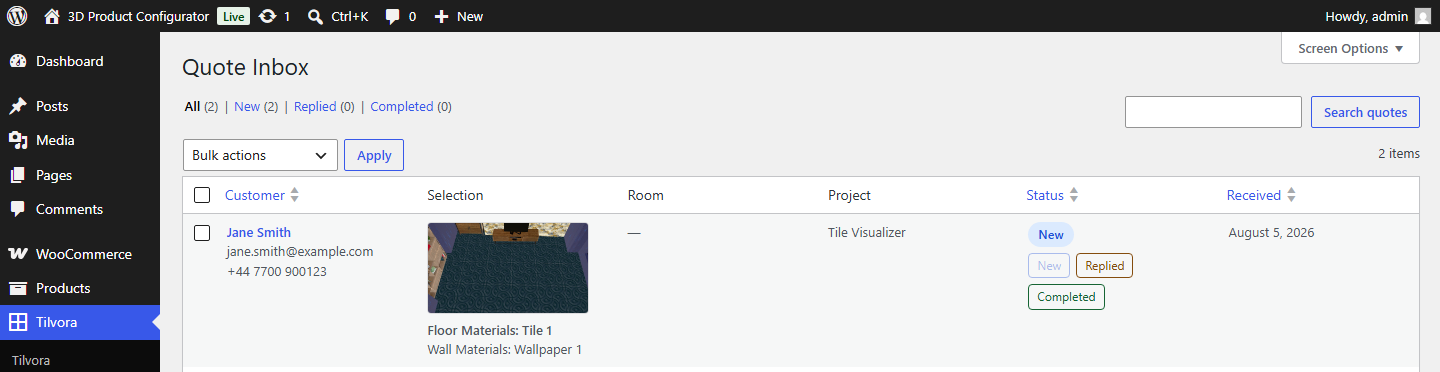
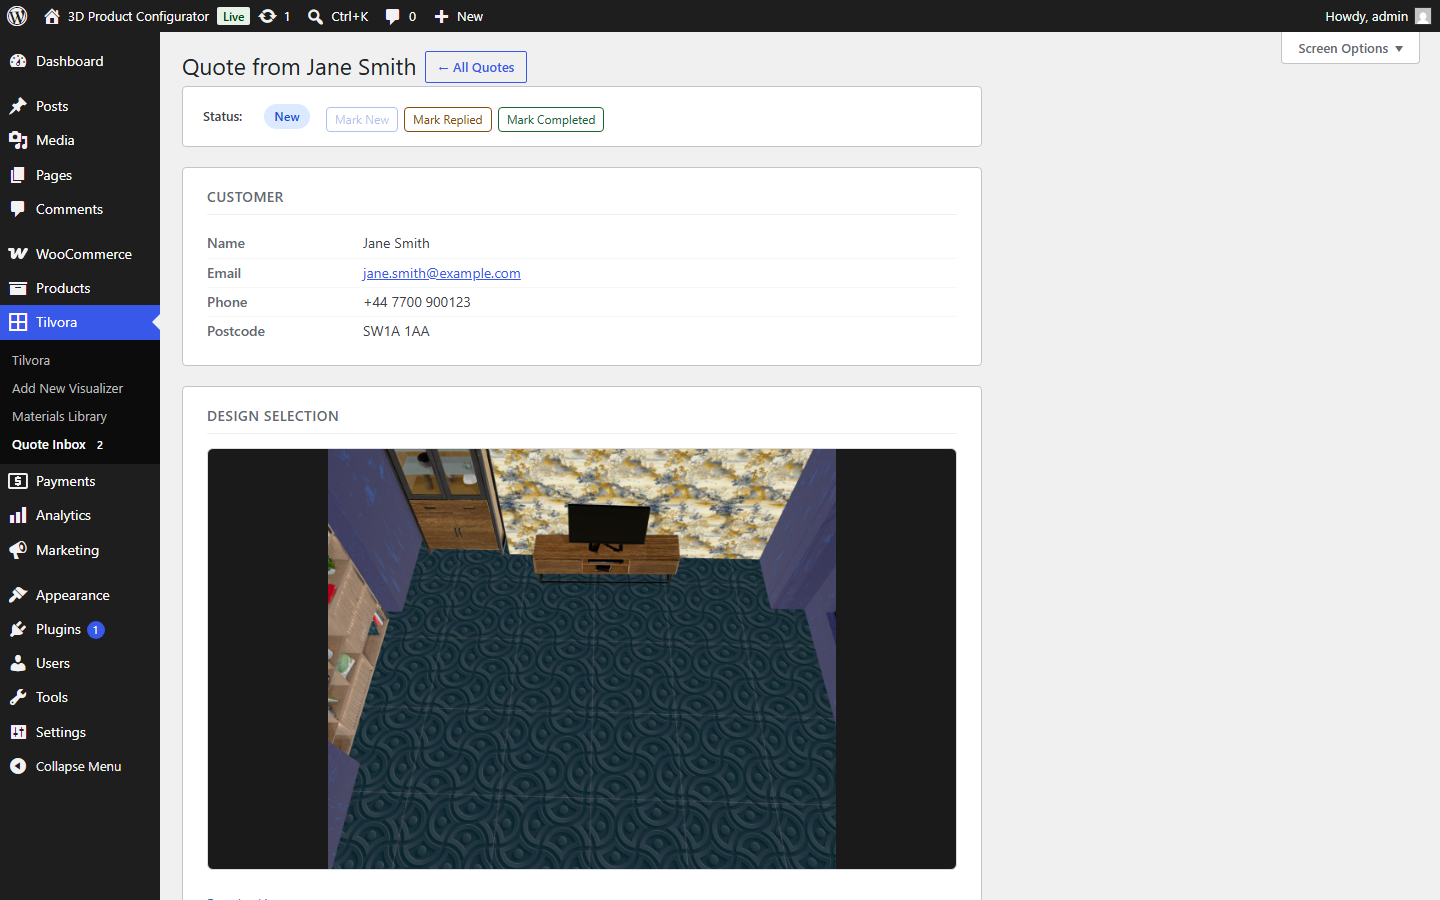
Open a quote to see its full detail card: the customer's contact info, their design snapshot (downloadable), their full selection, price, and any notes. Status can be changed inline from the list or the detail view — this updates instantly via AJAX, with a plain link fallback if JavaScript is unavailable. The badge next to the Quote Inbox menu item shows how many quotes are currently New.
A new pending count only appears once a quote has actually been submitted — the count doesn't include drafts or anything not yet sent.
Email notifications
Every submitted quote triggers two emails, sent via your site's own wp_mail() configuration (no third-party email service is involved):
- To your site's admin email — the customer's contact details, their full selection, room/price info if provided, and their notes. Its Reply-To header is set to the customer, so replying goes straight to them.
- To the customer — a confirmation summarizing their request, with Reply-To set to your admin address.
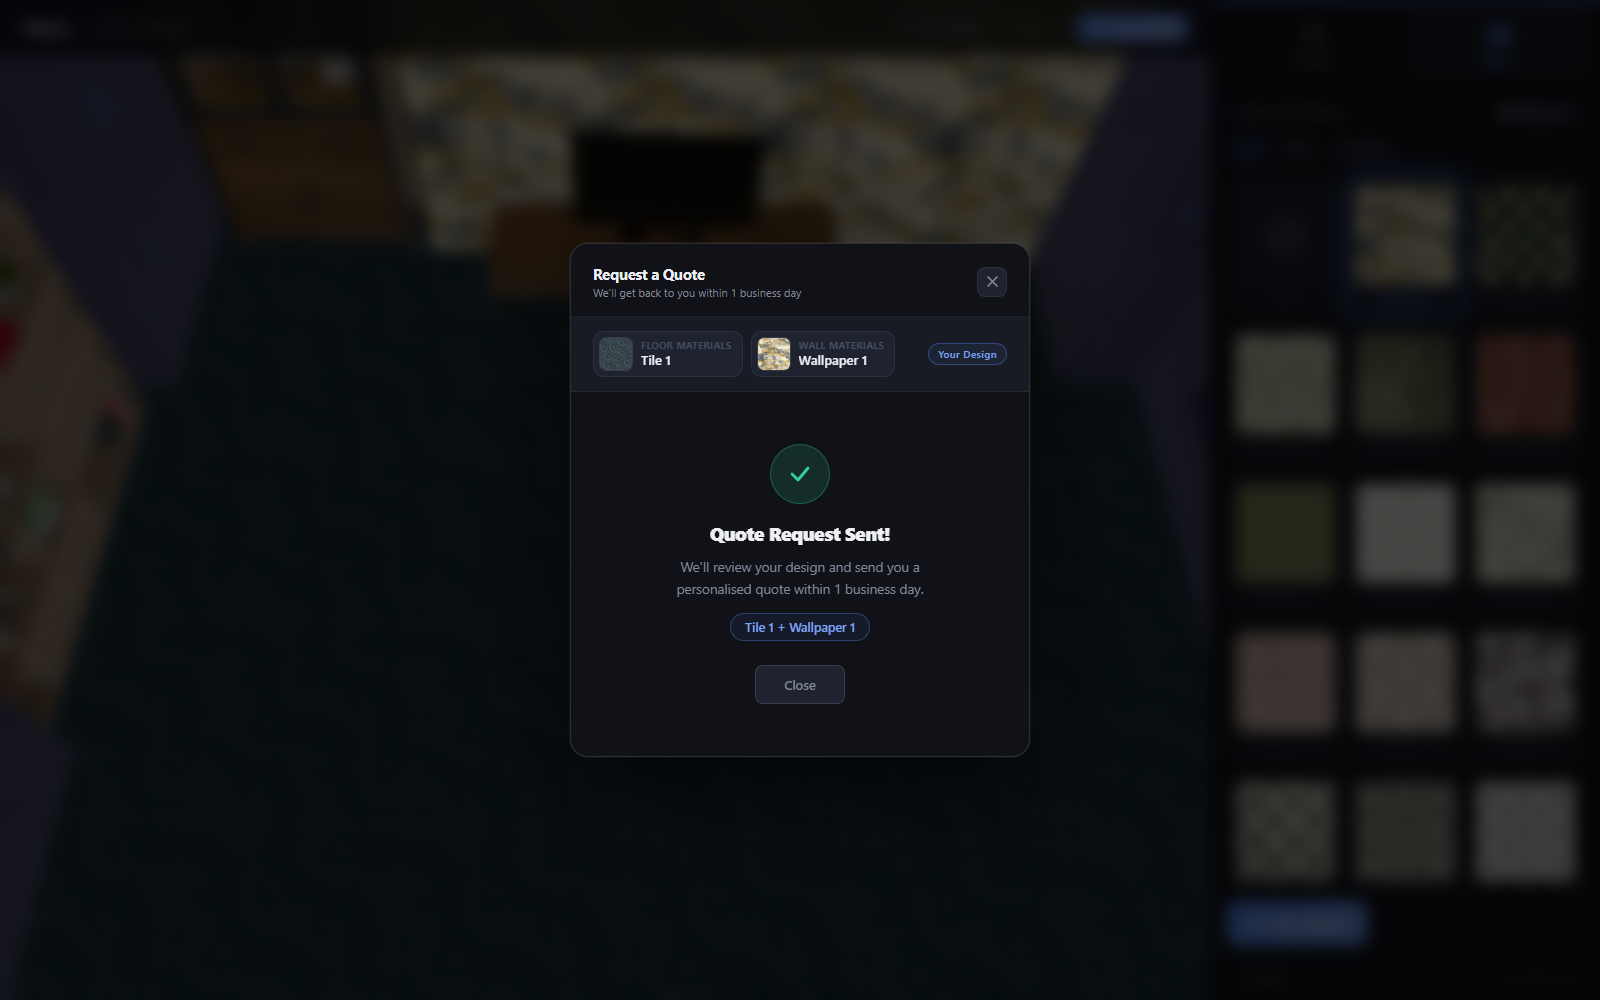
These are sent a moment after the quote is saved (via WP-Cron) rather than while the customer waits, so a slow outgoing-mail connection never delays their "Quote Request Sent!" confirmation on screen. If emails aren't arriving, see Troubleshooting.
Reference
Control types
Every control in a tab's controls array has a type, an id, a label, and a cfgPath (the dot-notation path where its current value is stored, e.g. "floor.materialId"). Beyond that, each type takes its own fields:
| Type | Purpose | Key fields |
|---|---|---|
material-grid | Thumbnail grid of Materials Library products. What the default Floor/Wall tabs use. | target (matches a meshTargets key) |
color-swatches | Row of solid-color swatches applied straight to the mesh's material color. | target, swatches: [{value, label, priceModifier?, roughness?, metalness?}] |
finish | Card grid for finish presets combining color + roughness/metalness (e.g. matte vs. gloss). | target, options: [{value, label, color?, roughness?, metalness?, priceModifier?}] |
material-preset | Named presets defined once under the config's top-level materialPresets and referenced by key. | target, options: [{value, label}] |
env-grid | Scene background/environment picker (defined under top-level environments). | options: [{value, label, cssClass}] |
switch | On/off toggle wired to a viewer effect. | effect (see below) |
slider | Numeric range wired to a viewer effect. | effect, min, max, scale?, displayUnit? |
text-input | Free-text field (e.g. an engraving/personalization line). Never affects the 3D model; only appears in the quote's field list and optionally adds its own price. | priceModifier? |
switch and slider controls take an effect key from a fixed set: environment, ground, shadows, autoRotate, ambientLight, keyLight, exposure, environmentIntensity. Any control can add a priceModifier (a number added to the running total when that value is selected) except material-grid, which prices itself from the selected Materials Library product, and env-grid/switch/slider, which don't carry a price.
By default, a customer's material-grid, color-swatches, finish, material-preset, and non-empty text-input selections are included in their quote request; env-grid, switch, and slider (scene/viewer settings, not part of what they're ordering) are excluded. Set "includeInOrder": true or false on any control to override this.
Config JSON reference
Top-level fields a project's Config JSON can set. Anything omitted falls back to the bundled default.
| Field | Description |
|---|---|
id | Set automatically to the project's post ID — used as the storage key for a visitor's saved selections. |
productName | Set automatically to the project's title. |
currency | Symbol prefixed to every price shown, e.g. "$". |
basePrice | Starting price total before any selection is added. |
modelPath | Path/URL to the GLB model. Overridden automatically if a model is uploaded via the project's media picker. |
camera | fov, distanceMultiplier, angleX, angleY, minPolarAngle, maxPolarAngle — see About the Config JSON. |
meshTargets | Maps each logical target key to the exact mesh name in the GLB. See Preparing a GLB model. |
defaults | The starting value of every cfgPath, applied before any saved visitor state. |
materialPresets | Named {color, roughness, metalness} presets referenced by a material-preset control. |
environments | Named scene backgrounds ({color, fog?}) referenced by an env-grid control. |
uiTabs | The side-panel tabs and their controls — see Control types. |
uiText | UI label overrides — see About the Config JSON. |
Tab icons (the small SVG shown per tab) accept a limited set of SVG shape tags — svg, path, rect, circle, line, polyline, polygon, g — with their common presentation attributes. Anything outside that allowlist is stripped when the project is saved.
Frequently asked questions
Does this require WooCommerce?
No. Tilvora is fully standalone and works on any WordPress site.
What image format should my tile/wallpaper photos be?
JPG, PNG, or WebP all work — Tilvora uses the standard WordPress media library. What matters more is that the photo is a seamless, square-on crop of the material at the physical size you enter in Width (cm)/Height (cm). See Tile & wallpaper images.
Does this load anything from a CDN?
No. Three.js and the Draco decoder are bundled locally with the plugin and served from your own site.
Can I run multiple different visualizers on one site?
Yes — each project under Tilvora → Add New is independent, with its own model, Config JSON, and shortcode.
How do customers request a quote?
They click Get a Quote in the visualizer, fill in their name and email (phone/postcode/notes are optional), and submit. The request is emailed to your admin address, a confirmation goes to the customer, and it's saved in Tilvora → Quote Inbox.
What happens on a browser without WebGL?
The loader shows a friendly error message instead of a blank screen.
Where do materials come from — do I add them per project?
No — the Materials Library is shared site-wide. Add a material once under Tilvora → Materials Library and it becomes available to every project whose meshTargets includes a matching target.
Troubleshooting
The shortcode shows nothing on the page
The shortcode only renders once its project is published (not a draft) and the id in the shortcode matches an existing project. Check Tilvora → All Visualizers for the correct ID and status.
A material doesn't appear in its tab
Confirm the material is published, and that its Applies To (mesh target) field matches one of the project's meshTargets keys exactly (e.g. floor). A material set to a target the project's config doesn't define won't show up on that project.
A material shows in the panel but doesn't appear on the model
This almost always means the mesh name in meshTargets doesn't exactly match a mesh node name inside the uploaded GLB. Check your browser's developer console for a warning naming the mesh Tilvora couldn't find, and confirm the name (case included) against what your 3D tool exported. See Preparing a GLB model.
The tile texture looks stretched or has a visible seam
Usually one of: the material's Width (cm)/Height (cm) don't match the real product, the source photo isn't seamlessly tileable, or the GLB's floor/wall mesh wasn't exported at true real-world scale. See Preparing a GLB model and Tile & wallpaper images.
Config JSON won't save
Click Validate JSON in the metabox to see the exact parse error. Tilvora refuses to save invalid JSON and keeps the previous working version (or the bundled default) active until it's fixed, so a typo here never takes the live visualizer down.
Quote request emails aren't arriving
Quotes are saved to the Quote Inbox immediately regardless of email delivery, so check there first to confirm the submission itself worked. Email delivery goes through your site's normal wp_mail() setup (the same path as password-reset emails, etc.) and is scheduled via WP-Cron a moment after saving — if your site's WP-Cron isn't running reliably (common on very low-traffic sites, since default WP-Cron only fires on page loads), or your host's outgoing mail isn't configured, emails can be delayed or dropped. An SMTP plugin is the usual fix if your host's default mail sending is unreliable.